So here is my idea. I’m going to put together a blog that chronicles my attempts to live a more sustainable and connected life. I’m looking for ways to help my household, community, and the world to become healthy and engaged in things that matter. 2016 taught me in no uncertain terms that time is fleeting. So this is a place to put some thoughts and iron out some attempts. I’d be happy for you to peek in on this – but only if it’s in the spirit of love and light. So onward.
While the term “pricking out” seems to be more of a UK term for the practice of dividing plant seedlings, it certainly does get your attention. This year I’m starting our vegetables and flowering plants (many were started in November – see post below on planting flowering natives) from seed. This is a really wonderful way to honor seeds and their stories, especially if you can use seeds from places like Fedco, Hudson Valley Seeds, or Seed Savers Exchange, these are companies that tell you where the seeds came from and support Native communities with seed royalties and seed rematriation programs.
I’m linking a website with a much more detailed version of what you need to do to re-pot your initial seedlings.
This gardener provides you a step-by-step layout of the process, I’m just putting down some of my initial thoughts.
Last year I didn’t do this step and many of my seedlings got too leggy and suffered from over-competition for nutrients in the small pots (especially the tomatoes). So in year two, I’m trying to give everyone a healthier start! Here are the initial starter modules under the grow lights, this year I also added heat mats.
Tomatoes and some slow starting Peppers in my new seed starting set up
Dividing your seedlings happens when their first “true leaf” appears, this is the first leaf that emerges looking like a miniature version of the plant’s leaves. For tomatoes, this is the leaf that has the jagged shape of a tomato leaf. Get your larger transplanting pots filled with good soil and a nice indentation (with a pencil – or your finger), pop out the cell of seedlings, and carefully tease apart the plants. For me, this is an activity that I need some time and calmness to complete. The seedlings are VERY tender and you don’t want to touch the stem or pull the roots too vigorously. I turn out the cell in my hand and separate using a kabob skewer. Do some good Zen breathing before attempting.
Pricking out seedlings – under the grow light glare
Remember to give each new pot its own label and give the new pots a good watering to welcome the plants to their new home. I’m hopeful that this “extra” process will help these plants get a good start in our very short growing season. But as the blog title suggests – my life is one big experiment!
Local groups come together on establishing a pollinator garden in my little town of Merrimac
Students, Garden Club, Friends of the Library, and Scout the Dog – all admiring Native Pollinator Garden planter
After discussion, negotiation, and some punching above my knowledge level on native pollinators; last week my little town took our first steps in establishing a Native Pollinator Garden at the Public Library. In the last post I mentioned that over the pandemic, the library (and its parking lot) has become an area of quiet refuge for me. There is a lawn area in the back of the library, and as I sat there over the last two years, I thought about the possibility of planting a garden for pollinators and what it would take to make that happen (I couldn’t ninja garden a big planter).
Using my work skills, I framed a short proposal with some initial ideas and set about networking with folks in the community who might be able to help. To my great joy, the Merrimac Garden Club, the Library Staff, and the Friends of the Library Board were all excited to talk about the idea. The Garden Club was all in on obtaining compost and soil for the planter while offering their expertise on different possible natives to use.
Pollinators at work
The Friends of the Merrimac Library were the first group to offer financial support for the project. The Library Friends funded our other community partner who started to make the project tangible, these were students in the carpentry class at the Whittier Voc High School. They enthusiastically took on the project and built a beautiful three-tiered planter out of red cedar.
Whittier Carpentry Students and Instructor with Planter
I’ve ordered native plant plugs from the Native Plant Trust, which we will get in May. I also have some native plants started from seed in November to both plant and give away. It’s exciting and a bit scary as the planter should be a thing of beauty – BUT gardens take a little while to mature, and the first years will be a learning process.
We hope to unveil a planted garden, with educational programs through the Library in June!
How I stayed sane (ish) through the pandemic by “secretly” planting flowers at our town’s free borrowing/lending libraries
Over the last two years (and counting) we have all been living a new type of life – filled with evolving danger, anxiety, and isolation. Everyone on this planet has, and we’ve all found ways of dealing or not dealing with the pandemic. I have taken on some of the troupes – more carbs, more spun candy Netflix (yes to Sex in the City reboot – NO to Emily in Paris). One thing that kept me going in the first year of this scary time was the space at our library with the little lending library. Give a book, take a book – what a wild concept in our uber consumption/capitalist time.
There had been a struggling set of annuals at one time around the base of the little library – but in lockdown that became the least of anyone’s worries and they were long dead by May 2020.
I decided to plant the space with seed-grown, fairly hardy annual flowers, the kind I’m able to grow (emphasis on hardy). I filled the pot (and then another on the other end of town) with Zinnias, Marigolds, herbs, and other ephemerals from my wild seed mix. Compared to the more standard window boxes and flower pots around my town – this was somewhat shaggy and wild.
Shaggy and Wild Garden at Local Library
Seeing this grow into something colorful helped me, and I hope some other folks, through our first year with Covid. It was also my small act of “rebellion”, against the fear and anxiety I was feeling for my family, my country, and the world. Not having asked permission from anyone – I wasn’t sure who to ask – I decided that asking forgiveness if someone was unhappy about this was perhaps a better path.
As I finish writing this on a snowy February day in 2022, we are still in the pandemic but have the life-saving “tools” of vaccination and better masking. While things feel more manageable – the cloud of the next variant and exposure, especially for older and immune-compromised friends/family, remain ever-present in my mind.
Secret and Public – Splash of color in a dark time
My small act of “secret gardening” has led me over the last couple of years to work on a community garden project with my local library, gardening club, and technical high school – that will hopefully be unveiled in May. Our town’s open space committee is also in the nascent stages of talking about a community garden site.
Here are the native flowers growing under the snow on my deck for the next planting season. I can’t wait to see how they grow and where I can share them – in the free library spaces and with other folks interested in growing native plants.
Milkweed, New England Aster, Wild Lettuce and more…
So take a step forward, take a chance at getting scolded by your neighbors, town matrons, or your HOA, and plant something beautiful, shaggy, and wild. This is a great site to get you going. https://wildseedproject.net/
My Container Deck Garden and My Down the Road in the Ground Garden
So, as I mentioned in March (my last post) I got a jump start on growing seeds this year. I started tomatoes, herbs, peas and other plants inside under grow lights. It was my first time doing this and I would claim a 75% success – enough to have me try again next year.
While the full results are still to seen; the tomatoes are large and leafy, starting to fruit. But sadly, the peas were a disaster, initially they grew well but the chipmunks digging them up, plus other variable (not enough sun/soil?), made them produce very little.
Deck Garden
The other ongoing drawback of gardening at my house is we live in a forested area – which is wonderful for wildlife and shade but not great for growing vegetables. I’m still trying this year, giving each plant their own pot and space. Everything looks good, but I’m not sure the fruit will mature.
One of the new things I’m trying this summer is gardening somewhere else. A dear friend has moved into a house about 10 minutes away – and the site gets sun! They have kindly let me put in a small plot on their property. We shall see how things progress – so far, no groundhogs have gotten through my fencing. I’m trying a no dig/low dig method hopefully building the soil without releasing too much carbon. Over the last month I’ve started learning more about permaculture here is a great youtube link with Morag Gamble from the permaculture education institute. It’s exciting and I’m trying to look on all of this as learning, learning, learning!
February was tough this year gray, cold and the pandemic still very much with us. March is showing more promise the weather is warming, vaccines are being scheduled AND I started two seed trays this weekend!!
This year I’m trying to start my seedlings under grow lights. My season is so short (here in the woods) that I need to jump start everything – but especially if I want tomatoes. I’ve chosen only small fruit sizes this year hoping to get some fruit this year before frost. We shall see.
I’m also starting some different herbs this year. Some like Lemon Balm and Comfrey lean more medicinal. Compost tea or just flavorful teas for humans. I’m also starting some good pollinators which I will need to transfer to sunnier spots. This week I started purple salvia. From the picture you can tell it provides vivid color in the garden, but it is also resistant to dry summer weather and best of all attracts pollinators. A triple gift to the garden!
There are many, many good gardening Youtube channels talking about seed starting and everything else gardening related. One of my favorites right now is Joe gardener – here is a link to one of his seed starting video. I’m not going to pretend to have the best advice – expect just get started. Start small and experiment with some quick growing things like lettuce and some easy flowers (I like marigolds + zinnias). It feels great!
We still have a ways to go before real Spring is here in northern MA. But I plan to celebrate Spring Solstice this year on March 21st with more planting; finding ways to express my deep thankfulness for love in my life, the Covid vaccine and the greening around me.
What is that nagging chore that you know you should do but you put off because it’s a big production and kind of icky?
Well, there are probably many on my list including cleaning the fridge, cleaning the gutters (man it is high on the roof – even the side much closer to the ground) but perhaps the most avoided of all chores is cleaning the bird feeders.
Now my good birding friends will be saddened to know that I reluctantly do this about two times a year (birding sites tell us to do this monthly). So, in an effort to be a better bird person I went to work this weekend on cleaning my feeders.
The other part tricky part of this cleaning is that many traditional birding sites tell you to use bleach or at least one part bleach to clean the feeders. I am trying to eliminate all bleach products from our lives and our household environment. When someone close to you dies of cancer you start looking at the multiplicity of toxins that surround you and try to eliminate them. So I found a site that claims a green way to clean your feeders. Here is the link to the alternate cleaning process.
I’ve had encouragement and advice about making yogurt for many years, from many different quarters. My friend Carol makes her batch every week and Agnes whose mother brought over her yogurt starter from Armenia and a deep yogurt history with my husband’s mentor Bob Colombosian (the Colombo yogurt GUY).
So, when I finally decided, with some trepidation, to try to make my own yogurt I found that it was almost a mom-blogosphere trope to outline experiences in making yogurt. I am still going to forge on and do a quick post on my successful first-time yogurt making. On round one, I think I can give up store-bought yogurt which is my daily breakfast. Ben seems like he’s on board – our 16-year-old is not yet sold on plain yogurt – but may try with some VT honey.
I decided to make a small batch in case it was beyond eating I wouldn’t feel awful about wasting milk – a Robb Farm cardinal sin.
Things you will need:
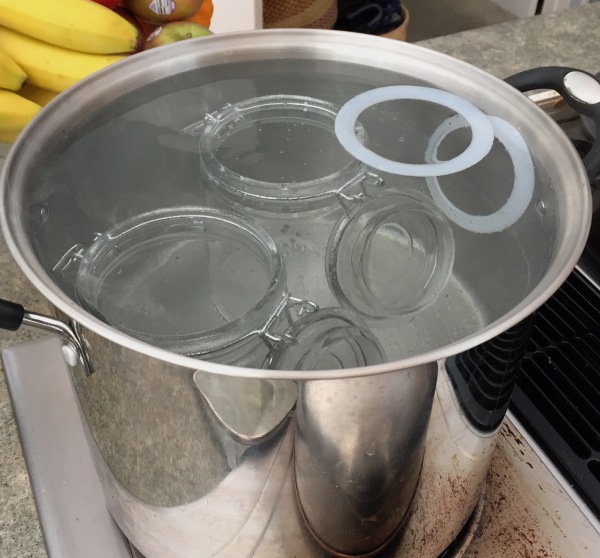
Containers that you can sterilize (I used two 40oz. glass containers)
A big pot to boil the containers – needs to be able to hold an inch of water over containers.
A pot to hold the milk as it heats – something with a thick bottom so the milk won’t scald.
Pot holders
Tongs to get the containers safely out of the boiling water.
Cooler
Hot water bottle
Funnel for getting yogurt into containers
Thermometer to test milk
Ingredients:
½ gallon of whole milk
1 cup of plain whole milk yogurt (this is your “mother”) – if you keep making you can use from your last batch)
Directions:
1. Place containers in a big pot with water – make sure they have about an inch of water covering – boil for 10 minutes – then move off heat but leave everything in the hot water until you are ready to use
2. Pour milk into heavy bottomed pot – heat the milk to 185-190F
3. Place pot into a sink full of cold water – cool milk to 120F
4. Stir in the cup of yogurt starter or “mother” into the cooled milk.
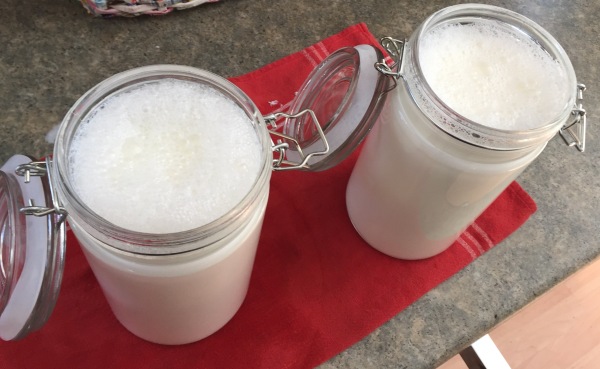
5. Pour milk/yogurt mix into containers (you’ve now taken them out of the pot).
6. Place containers into a cooler (in a warm place) and put a warm water bottle on top of them.
7. Close the cooler and put your timer on for 3 hours – don’t peek this is when the magic yogurt making happens.
8. After 3 hours put the yogurt containers in the fridge and cool. You now have homemade yogurt!
I’m looking forward to my next round my yogurt panel of experts tell me that using the starter from the previous batch deepens the taste.
[Yogurt update – I’m not on my third generation and the yogurt came out well this round. Even Mac liked it!]
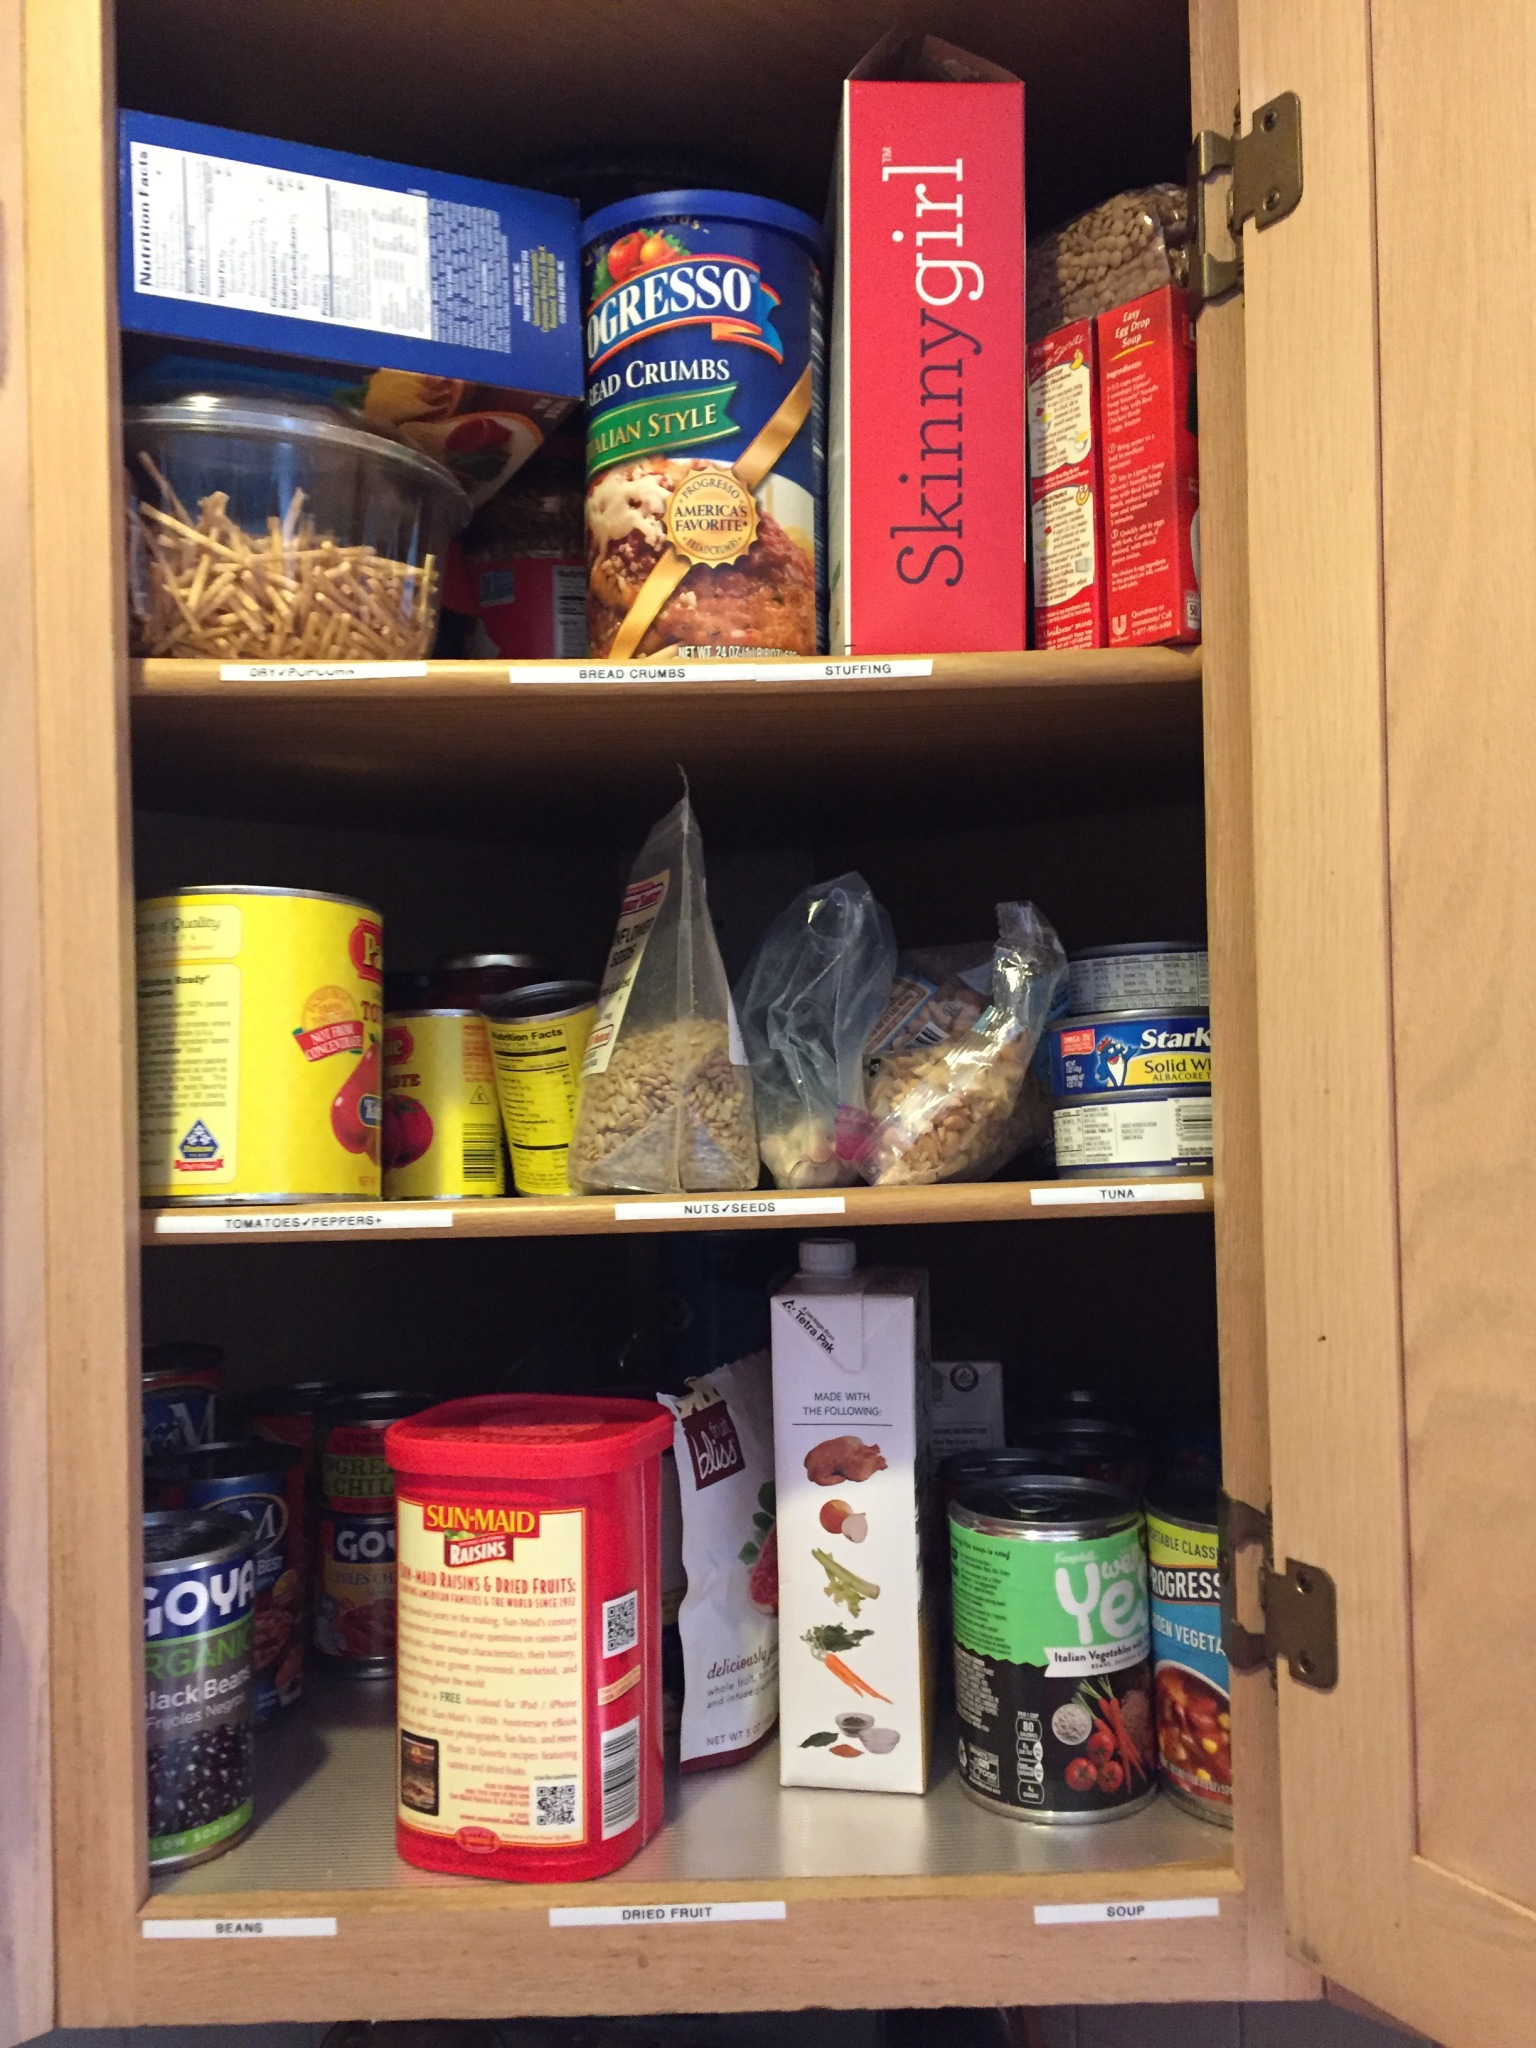
This has been a tough week as I knew it would be for all my family as we marked the anniversary of my Mom’s death. I haven’t been helped much by my internal chemistry or news from DC or work. So, I’ve taken to the cabinets. That is, I’m organizing all of my pantry cabinets. While my men think that I’ve lost it – the project is giving me an ever so slight feeling of control.
This process is also a small step to increase our financial sanity. After our mortgage, food costs are our biggest monthly expense. I’m hoping that knowing what we have in the pantry and fridge (tackling that next week) will allow us to better utilize our food. Meal planning is even harder if you have no clear picture of what’s available. “Let’s Eat what we have” has become my battle cry.
Here are my steps:
Take everything out of the cabinet – yes it’s a little scary at the bottom the cabinets (mine at least) but as the hymn tells us, be not afraid.
Check expiration dates (wow we had a lot of out of date baked beans) – throw the things that are too old – donate things you will NEVER eat (i.e. low sodium rice-a-roni – while a San Francisco treat needs to go).
Group things in a logical manner by type – this gets a little tricky because everyone organizes things differently – whoever uses the kitchen most should win.
Clean shelves – put down new shelving paper. I’m using non-sticky type as I really hate sticking then re-sticking the shelving paper.
Restock with edible and now findable food.
Label shelves – now I admit that this crosses a line – BUT if you want to get others to follow your system, it might help. Again, this is getting A LOT of eye rolling from my family so we will see if it works in the long run.
Start using what you have in your pantry – i.e. the coffee I’m drinking is from a hidden packet of freeze dried Starbucks I was thrilled to find!
So I know this doesn’t fix much in the world – and it may be a clear sign I’ve gone around the bend – but for now it gives me a little sense of harmony in a crazy week.
As we approach the one-year anniversary of my Mom’s death I’m filled with a number of feelings sometimes in progression, sometimes all at the same time. Grief is no longer a constant presence in everything I do, but it catches me at random moments especially when I wish I could share something or ask something of my Mom.
Today I’m attempting to bake a family favorite, my Mom’s blonde brownies. This is one of my Mom’s recipes that I never tried to replicate (like her macaroni & cheese) because it was so beloved that my version could not possibly come up to snuff. “As good as Grandma’s” has been a hard bar to get over. But today I came across this recipe in my Mom’s handwriting and decided to give it a try.
Here are the steps:
Wet ingredients together, then dry added just like any cookie dough, but no separate mixing the dry and no sifting (gasp). This is much easier than my standard chocolate chip dough.
Spreading in the pan takes a little work. It’s good to take a second look from the side to see if the dough is even (or have your sharp-eyed kid help). No picture of the sprinkling of the chocolate chips because what happens in the kitchen stays in the kitchen and sometimes a few chips may go astray…
The final product looks about right, but we will see if it passes muster. Seeing the pan filled with the blonde brownies brings back good memories of boys small and big clamoring for them to be cut. My Mom filled our lives with love, care, and support. I hope that in some way baking her cookies for my family honors that legacy.